redbeard719's 392 build...

I went with this one:


I also recommend the drain adapter kit and the snap on cover.


Just ordered all three parts so I can have an easier, cleaner oil change next time. I'm anxious to try it out, but have fresh oil right now.
 
Small items getting done lately. Nothing major or time consuming at this point, but I do have some of that on the horizon.

The XG Cargo Stealth Gama bags finally came in this week. I ordered them on 1/1/24... Fit is perfect, no rattles and the bags can be removed easily enough from the frames if desired. Even the frame is only attached with a single screw. No cutting on any trim pieces. These bags give quite a bit of extra storage, and are so far back that they're not in the field of view at all.

IMG_0778.jpeg


IMG_0779.jpeg


And then I started in on the SwitchWorks Alpha12 install. I had to move my CMM mirror mounts from the top to the bottom of the grab bar handles to accommodate the extra ball mount. The switch bank is attached with the smallest 67 Designs arm fitted up with a 1" ball on one end (to the switch bank bracket) and a 20mm ball on the other end (to the CMM ball).

One single wire runs discreetly into the dash, and will pass through the firewall grommet to then connect to the main brain, which will live somewhere under the hood.

IMG_0782.jpeg


IMG_0783.jpeg


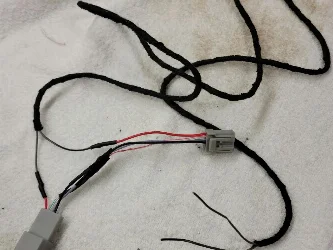
And I finally started in on the wiring for the cowl-mounted LP4s. With the SwitchWorks, I rebuilt the harness from BD. Using a fish tape, I was able to pass the wire through the conduit at the top of the firewall without having to try taking it apart.

IMG_0774.jpeg


IMG_0775.jpeg
 
Last edited:
Small items getting done lately. Nothing major or time consuming at this point, but I do have some of that on the horizon.

The XG Cargo Stealth Gamma bags finally came in this week. I ordered them on 1/1/24... Fit is perfect, no rattles and the bags can be removed easily enough from the frames if desired. Even the frame is only attached with a single screw. No cutting on any trim pieces. These bags give quite a bit of extra storage, and are so far back that they're not in the field of view at all.

View attachment 33263

View attachment 33264

And then I started in on the SwitchWorks Alpha12 install. I had to move my CMM mirror mounts from the top to the bottom of the grab bar handles to accommodate the extra ball mount. The switch bank is attached with the smallest 67 Designs arm fitted up with a 1" ball on one end (to the switch bank bracket) and a 20mm ball on the other end (to the CMM ball).

One single wire runs discreetly into the dash, and will pass through the firewall grommet to then connect to the main brain, which will live somewhere under the hood.

View attachment 33265

View attachment 33266

And I finally started in on the wiring for the cowl-mounted LP4s. With the SwitchWorks, I rebuilt the harness from BD. Using a fish tape, I was able to pass the wire through the conduit at the top of the firewall without having to try taking it apart.

View attachment 33267

View attachment 33268
Where did you get the XG Gamma Stealth bags from? I've seen issues with finding those in stock.
 
Where did you get the XG Gamma Stealth bags from? I've seen issues with finding those in stock.
I bought them directly from XG Cargo. Looking at their site today, they're sold out again. I guess I just happened to get lucky and submitted my order as a backorder option? I ordered them on 1/1/24 and they just arrived on 3/20/24. If you can get in on a backorder deal, I do think they're worth it.

The Stealth series comes with the waterproof bag, the internal hard-bag, and the bags themselves are a little more water resistant. The bonus is that all of the stitching is black too. I really didn't want the Adventure bags mostly because of the accent color on the stitching.
Much appreciated! I see Quadtratec has them, but leads me to wonder if that's accurate or not.

Awesome build by the way!
 
The past couple days/week have been productive. I installed the 2024 grille from Distinction Applied. Before it went on I had it done with PPF and ceramic coating. Replacing the grille meant I had to remove the bumper and winch. It was so much fun!

IMG_0838.jpeg


I also installed my second set of Baja Designs LP4 combo lights onto the bumper, underneath the Maximus-3 triple hoop. They're as far back as possible, and no not protrude out past the front of the bumper.

IMG_0840.jpeg


IMG_0841.jpeg


The last big thing I've been trying to noodle out has been the SSV Works SwitchWorks Alpha 12 switch bank.

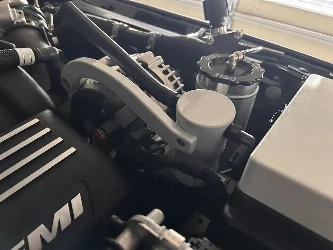
The main unit - I needed to figure out a place for it under the hood. I explored several ideas, but in the end I contacted Baja Designs to see if I could buy the mounting bracket for the Spod that they sell for the 392. They sold it with the condition that it was a final sale - it wasn't cheap and it HAD to work or I would have the sads! 🤣

It arrived yesterday and it's not only a perfect fit to the Jeep, but for the SwitchWorks unit too. I added some rubber padding under the mounting points to protect my fender paint and drilled out the mounting holes for the unit. It's steel so I did touch up the fresh holes with some Rust-o-leum paint.

Now I await Amazon to deliver the 3m Adhesion Promoter. The SwitchWorks unit is about 2.5" longer than the bracket - I'll attach one end with hardware and the other end will be secured with 3M VHB tape for peace of mind. It definitely won't go anywhere once it's finished up. The Spod bracket is very solid and even has a supporting leg that extends downward to attach to the ABS module mounting bracket. I'm so pleased with this set up and don't foresee any issues.

IMG_0875.jpeg


IMG_0874.jpeg
 
I finished up the SwitchWorks Alpha12 install this weekend. I gotta say, I'm really happy with this solution for extra switches.

The Alpha12 has 6 low output circuits and 6 high output circuits. The unit allows you to change the behaviors of each switch (momentary, latching, strobe, ignition, battery, etc), and you can also link several outputs into one switch. For example, if you wanted separate switches for two different sets of lights you can do that - but you can also program a button to activate all lights at once.

To keep the clutter under the hood to a minimum, I removed the extra pigtails that aren't yet in use and used cavity plugs to seal those holes on each of the connectors. Right now, I only have my Warn winch solenoid trigger and the Diode Dynamics Offroad lights (the ones built into the DD Elite Max Headlights) hooked up.

The SwitchWorks app (Windows PC only) allows you to customize the icons on the switches. For each custom icon, you can choose the on and off images separately.

The Alpha12 comes with a 100a inline fuse for the 4AWG power line. I decided to replace that with a Blue Sea 100A circuit breaker - this way I can cut all power easily, while still having the protection of a 100A breaker.

IMG_0913.webp


IMG_0914.webp


IMG_0911.webp
 
That looks great and very nice install. I would really love to have some expansion so I could switch things separately as I’m all out of AUX switches lol
 
That looks great and very nice install. I would really love to have some expansion so I could switch things separately as I’m all out of AUX switches lol
I hear that. This allowed me to change things up a little bit. I hated the giant Maxi-fuses on the ARB harness. So I removed those and brought the wiring back into the cab for the ARB twin compressor. It's hooked up to Aux1/2, since those are both 40A switches.

So I have two oem aux switches left, and then the Alpha12. What I really like about it is that it's got actual buttons. It's not another touchscreen or controlled with a phone app via bluetooth. Actual buttons are what sold me. If you're thinking about adding extra switches, the Alpha12 is definitely worth considering.
 
Last edited:
I’ve had the full Goose Gear Stealth platform since late last August. I finally got around to installing it today. It’s no surprise it’s made from birch plywood, but the quality is outstanding. As it should be, considering the price!

I’m glad to have a nice flat deck in the back for gear and my two golden retrievers. The DirtyDog cargo liner will still fit really well and now I won’t lose all the storage under the seats by having them folded down.

It’s just my wife and I - the dogs are the only back seat riders. No need for those rear seats for us!

IMG_0936.jpeg


IMG_0937.jpeg
 
I noticed that there was some markings on the HydroGuide plastic directly above the wiring harnesses for the SwitchWorks Alpha12. It was adhesive residue from the harness tape I had wrapped the wiring with.

I had three options:
  1. Leave it and monitor. Address it if it becomes an issue.
  2. Use a heat gun and heat the HydroGuide part and try to mold in a divot for clearance.
  3. Remove everything and turn the Alpha12 unit 180*, which would put the taller harness plug just past the relief/step in the HygroGuide.
I chose option 3. It just seemed the right way to do things. I had to make new power/ground cables to account for the different lengths, and I'm glad I did. The replacement 4AWG cable I bought from Crutchfield is a much higher quality than what was supplied with the Alpha12. The Crutchfield cable also has a silicone jacket, and a higher strand count - much more flexible and better suited for higher power draws.

Getting the Alpha12 off the bracket was a bit of a chore. The 3M VHB tape combined with the adhesion promotor created an incredibly strong bond. But, I was able to saw through the tape with fishing line to separate them. A little Ronsonol lighter fluid cleaned up all the residue and it was like starting at square one again.

Here's the finished product - I'm quite happy with the outcome.

Witness marks on the HydroGuide:
IMG_0955.webp


IMG_0987.webp


IMG_0989.webp
 
I’ve had the full Goose Gear Stealth platform since late last August. I finally got around to installing it today. It’s no surprise it’s made from birch plywood, but the quality is outstanding. As it should be, considering the price!

I’m glad to have a nice flat deck in the back for gear and my two golden retrievers. The DirtyDog cargo liner will still fit really well and now I won’t lose all the storage under the seats by having them folded down.

It’s just my wife and I - the dogs are the only back seat riders. No need for those rear seats for us!

View attachment 34449

View attachment 34450
Looks great. I just installed my cargo plate. Not 100% certain that I will seat delete but want the option.

My cubby hole key was missing.
 
Looks great. I just installed my cargo plate. Not 100% certain that I will seat delete but want the option.

My cubby hole key was missing.

That's a bummer about the cubby hole key. If you look on the lock itself, you can see the key/lock code laser etched. Hopefully Goose Gear can get you the proper key easily enough.

The rear seat delete in our case has worked out well. Our dogs love having a nice sturdy and flat surface.

That said - I do notice that the Jeep is louder now without any of the OEM rear components. I have a full Sound Assassins kit from Hothead Headliners that I need to install. I think the majority of the noise is coming from the rear wheels since there is no rear seat to block it. Plus, the AWE exhaust is right below the rear tub. And also, the tail gate. I plan to remove the GG parts, the wheel housing carpets, rear plastic trim, and the GG tailgate table to install the sound deadening. I'm not looking for Cadillac-quiet, but if I can get back close to how it was with the rear seat, I'd be happy. Beyond that would just be a a bonus.

Hopefully I'll get to that soon, but it might be a couple weeks before I get that opportunity.... 😬
 
Finally got started in on the Sound Assassin sound deadening kit I bought shortly after I installed the Good Gear Stealth system. The GG system combined with the AWE exhaust made things a little echoey in the cab. For longer rides/road trips, it wouldn't be something I'd want to listen to all day long.

Anyway, all the GG had to come out. I wanted to do the complete body tub, so pretty much all the interior had to come out with it.

I also ordered 36 sq/ft of Siless Liner (Amazon), which arrives tomorrow. I plan to add this over top of the Sound Assassin deadener but only in the rear cargo area.

I also took this time to add full Armorlite flooring for the front, rear, cargo closeout (across the rear floor to cargo area transition), and rear wheelhouse liners. We have two golden retrievers, and the Armorlite will make vacuuming out the dog hair easier. A bonus is that the Armorlite is a bit of a sound deadener itself.

So, with the interior removed, I got the Sound Assassin installed. I have enough left over that I might do the doors. I for sure plan to do the inside of the tailgate, but not until the rest of the Jeep is back together.

Hopefully I can get the Siless Liner put in tomorrow night and then get it all put back together.

Gutted:
IMG_1394.jpeg


Sound Assassin:
IMG_1399.jpeg


IMG_1400.jpeg


IMG_1401.jpeg


IMG_1402.jpeg


IMG_1405.jpeg


IMG_1403.jpeg


IMG_1406.jpeg
 
Finally got started in on the Sound Assassin sound deadening kit I bought shortly after I installed the Good Gear Stealth system. The GG system combined with the AWE exhaust made things a little echoey in the cab. For longer rides/road trips, it wouldn't be something I'd want to listen to all day long.

Anyway, all the GG had to come out. I wanted to do the complete body tub, so pretty much all the interior had to come out.

I also order 36 sq/ft of Siless Liner (Amazon), which will come tomorrow. I plan to add this over top of the Sound Assassin deadener, but only in the rear cargo area.

I also took this time to add full Armorlite flooring for the front, rear, cargo closeout (across the rear floor to cargo area transition), and rear wheelhouse liners. We have two golden retrievers, and the Armorlite will make vacuuming out the dog hair easier. A bonus is that the Armorlite is a bit of a sound deadener itself.

So, with everything out, I got the Sound Assassin installed. I have enough left over that I might do the doors. I for sure plan to do the inside of the tailgate, but I'll do that once the rest of the Jeep is back together.

Hopefully I can get the Siless Liner put in tomorrow night and then get it all put back together.

Gutted:
View attachment 36869

Sound Assassin:
View attachment 36870
View attachment 36873
View attachment 36874
View attachment 36877

View attachment 36880
View attachment 36881
View attachment 36882
Come do mine next 🤣
 
Finally got started in on the Sound Assassin sound deadening kit I bought shortly after I installed the Good Gear Stealth system. The GG system combined with the AWE exhaust made things a little echoey in the cab. For longer rides/road trips, it wouldn't be something I'd want to listen to all day long.

Anyway, all the GG had to come out. I wanted to do the complete body tub, so pretty much all the interior had to come out with it.

I also ordered 36 sq/ft of Siless Liner (Amazon), which arrives tomorrow. I plan to add this over top of the Sound Assassin deadener but only in the rear cargo area.

I also took this time to add full Armorlite flooring for the front, rear, cargo closeout (across the rear floor to cargo area transition), and rear wheelhouse liners. We have two golden retrievers, and the Armorlite will make vacuuming out the dog hair easier. A bonus is that the Armorlite is a bit of a sound deadener itself.

So, with the interior removed, I got the Sound Assassin installed. I have enough left over that I might do the doors. I for sure plan to do the inside of the tailgate, but not until the rest of the Jeep is back together.

Hopefully I can get the Siless Liner put in tomorrow night and then get it all put back together.

Gutted:
View attachment 36869

Sound Assassin:
View attachment 36870

View attachment 36873

View attachment 36874

View attachment 36877

View attachment 36880

View attachment 36881

View attachment 36882
Dang....yep, I am not doing that. Maybe a hothead and line under the rear cargo area.
 
Finished up the Armorlite finally.

It's noticeably quieter. The AWE exhaust no longer causes an echoey-ness inside the cabin. It's very well attenuated. But, when you hit the exhaust button, that MF'er wakes up like a BANSHEE!

Another bonus of the Armorlite (and the Sound Assassin material) is that all of the interior trim panels fit nice and tight. Like, you don't really realize or appreciate how poorly and loosely the trim pieces fit in the Jeep before installing Armorlite. Everything is snug and firm, and tight. It's awesome.

Armorlite is SUBSTANTIALLY thicker than the OEM carpet. There's no comparison at all. Maybe the 2024+ models have thicker carpets as part of the overall sound insulation package. I have no doubt Armorlite by itself would help dampen sound, as well as better insulate for heat/cool through the body tub.

I did have to make a few cuts in the Armorlite - on the driver's side for the Kraken connection bracket I cut a slit and inserted it from underneath. Super clean. And then for the brackets on the GG platform needed to have the slits widened where they attach to the rear seat mounting legs points. I also had to trim just a tiny bit around where the Desert Does It Seat Jackers mount for the front seat front rail mounts.

On the passenger seat, the OEM rear bolts were too short - OEM are M10 x 1.5 x 30. I ended up needing to get M10 x 1.5 x 35 bolts. I also picked up some new M10 x 1.5 x 30 bolts for the drivers side rear bolts. With the Seat Jackers in the front, now all of my seat bolts are 8mm Allen socket head cap screws. No more mix of Allen and Torx.

Anyway, enough of all that. It's done, and it was worth it. I'm super pleased with the results. Now all I have left to do is pull off my GG tailgate table and do inside of the tailgate. I also think I'll drop the MOPAR headliner and add some strips to the hardtop.

IMG_1414.webp

IMG_1416.webp

IMG_1418.webp

IMG_1420.webp

IMG_1421.webp

IMG_1428.webp
 
That looks great. How many cuts do you have on your hands?
 

Create an account or login to comment

Join now to leave a comment enjoy browsing the site ad-free!

Create account

Create an account on our community. It's easy!

Log in

Already have an account? Log in here.

Back
Top