Medsker
Well-known member
That's wild...
Follow along with the video below to see how to install our site as a web app on your home screen.
Note: This feature may not be available in some browsers.
I saw that and asked why I got no responseI saw a post today on a 392 Facebook group where someone replace part of it with brass
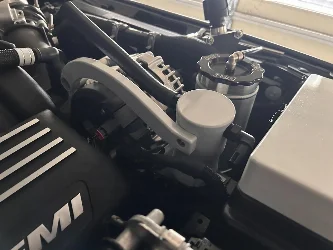
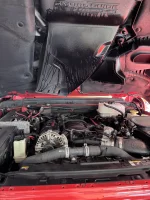
That hose 68481171AC is on back order can’t get one even if you need one waiting for one to come inView attachment 47846View attachment 47845View attachment 47847
First real problem I've had 2021 with 52k miles. No warning. Running fine. All of a sudden steam from passenger side and coolant smell. Was just pulling into church. Coolant everywhere under hood. Figured out where leak was by pouring distilled water into coolant recovery tank. Never overheated but would have of course. Hose was a PITA to replace. Got one at oreillys that was similar and cut it down to size. Don't know why they made the hose like this. It hooks to a smaller hose through a reducer. Had to remove 3 clamps to get thing apart. Smaller hose was easier to remove and not much space to work. Prob easier if I took the belt off, but all it all less than an hour job. Just had to find right pliers to get down in there to get clamps off. Not really that bad.
Filled back up with distilled water. Will get proper coolant tomorrow and drain some out and top it back off to get close to 50/50.
Oh and my daughter backed into the light pole at church when we went up there to get jeep and I had to tell the story of how I backed by dads jeep into a tree after I washed it when I was a kid. ........
All good now though. Truck and lightpole fixed. Busy day
8That hose 68481171AC is on back order can’t get one even if you need one waiting for one to come in
That hose 68481171AC is on back order can’t get one even if you need one waiting for one to come in
Ordered the part from the dealer got it in a few days. I would hate to change it out on the trail. Pain In good conditions. Took a small bath in reddish orange coolant. New coolant is blueberry color new part number compatible with what came in the Jeep in 23 but a different part number.old hose in the Jeep as a replacement on the trail if needed. 12350 miles .take no chanceView attachment 47846View attachment 47845View attachment 47847
First real problem I've had 2021 with 52k miles. No warning. Running fine. All of a sudden steam from passenger side and coolant smell. Was just pulling into church. Coolant everywhere under hood. Figured out where leak was by pouring distilled water into coolant recovery tank. Never overheated but would have of course. Hose was a PITA to replace. Got one at oreillys that was similar and cut it down to size. Don't know why they made the hose like this. It hooks to a smaller hose through a reducer. Had to remove 3 clamps to get thing apart. Smaller hose was easier to remove and not much space to work. Prob easier if I took the belt off, but all it all less than an hour job. Just had to find right pliers to get down in there to get clamps off. Not really that bad.
Filled back up with distilled water. Will get proper coolant tomorrow and drain some out and top it back off to get close to 50/50.
Oh and my daughter backed into the light pole at church when we went up there to get jeep and I had to tell the story of how I backed by dads jeep into a tree after I washed it when I was a kid. ........
All good now though. Truck and lightpole fixed. Busy day

I loosened the coolant tank fill cap, opened the drain valve on the radiator and let as much run out as would, catching it in a clean container to put it back in. Probably got 1 or 1-1/2 gallons out. Upper hose was fine, but it still made a mess when I pulled the lower hose, running a bunch down my sleeve and making a nice puddle to lay in.I bought one of these hoses a couple of weeks ago. I'm thinking about changing it before it blows. Lots of questions. How are you guys doing it? which end do you pull first the top or bottom? I assume it pretty much drains most of the coolant, any idea how much that is?
Maybe I'm getting old, I normally don't mind working under the Jeep, but this job has me thinking it might be better to take it to the dealer and have them do it.I loosened the coolant tank fill cap, opened the drain valve on the radiator and let as much run out as would, catching it in a clean container to put it back in. Probably got 1 or 1-1/2 gallons out. Upper hose was fine, but it still made a mess when I pulled the lower hose, running a bunch down my sleeve and making a nice puddle to lay in.
Doing it over again, I like the suggestion of @OldVetteGuy and would probably try that route. Its going to be a mess either way. The disadvantage of draining it from the radiator is that you do get a lot of coolant out and you have to get it all back in which isn't that easy. I lost a maybe 1-1/2 quarts from stuff coming out the bottom of the oil cooler house and some slobbering from the radiator petcock.
You will likely need a hose clamp removal tool for the bottom hose clamp, it is difficult to access (See post #48 above). Also a good idea to have an extra gallon of coolant to top it back up.
Here's the fill & bleed procedure from the factory manual (fwiw):
View attachment 51290
I followed the procedure but it made me pretty uncomfortable as you couldn't get much coolant back in at the start, meaning that there was probably poor cooling in parts of the engine due to air pockets. I released the upper radiator hose to let air out which helped some.
The fan never came on and I'm not sure the thermostat opened either due to the poor circulation. Doing it over again I think the approach from @OldVetteGuy would keep more coolant in the engine and result in a safer bleed procedure.
I'd also do a shorter warm up, just until the coolant was expanding to fill the reservoir. Then followed by a cool down, maybe repeating a couple times until it is stable.
LF
Yes great idea I did the easy top one first tool not so great. Angled pliers worked best knocked my top plug into the abyss . No coolant came out when I removed the top of the hose. The bottom is smaller but more difficult to get to and the clamp tabs on mine were on top of the hose thanks Jeep. (If maybe if I had plugged the top coolant tube) coolant would not have gushed out . I miss judged my plug size for lower hose outlet .I was able to slip new hose on and stop the shower and foul language. As stated above down the arm in the mouth and yes .I collected 1 1/2 quarts . New hose has clamp tabs on the bottom. I added 16 oz in reservoir started the Jeep let it get to about 125 degrees shut it off. Cleaned up the garage for a few minutes .Jeep pulled in the 16 oz so I added 16 more this time I ran the Jeep to 150 degrees shut it down all this with cap off reservoir. Again the Jeep pulled it in . Added the last 16 oz put the cap on and wet for a drive 7 minutes or so parked and popped the hood let it sit while mopping the garage floor all levels good no leaks. Old hose with regular hose clamps in a plastic bag in the Jeep..Here's a suggestion. Get yourself a couple of 1/2 " rubber caps from an auto parts store, remove the top first, put the cap in place, do the same thing on the bottom. Then when you have everything ready to install the new hose, bottom first then top.
Bottom line its going to be messy and plan on having to add fluid back in. And don't forget to burp the system to make sure you have all the air bubbles out of the system.
Perhaps someone who has actually gone thru the motion can comment. Bottom line I would rather accomplish this in my garage then out on the road in an emergency!

I like this idea. I wonder if it would work? It would be the first thing I would try if it blew on the trail as I have used it before on radiator hoses. It's a good thought....Another thought, I wonder if the applying a few wraps of the self-sealing silicon tape around the upper hose, before it fails, would work.
that is an excellent idea, im def adding that to my trail kit, prob would be enough to get home or at least to the main road withAnother thought, I wonder if the applying a few wraps of the self-sealing silicon tape around the upper hose, before it fails, would work.

That sucks at least it’s in your garage and not on a trailI think I just joined this club yesterday.
Ouch, what a mess, break out the pig matt!I think I just joined this club yesterday.
I carry that, and the replacement part. *knock on wood*that is an excellent idea, im def adding that to my trail kit, prob would be enough to get home or at least to the main road with
i went out and bought some that day, and ordered a replacement part and silicon hose, i think ill do a quality job on cutting the si hose and swap it out on the spare part so its a more long term fix if it happensI carry that, and the replacement part. *knock on wood*