🛠️ What did you do to your Jeep 392 today?

Very nice! I have the AAL version. Yours is more simple and thats good. Is that aluminum? I've had a hard time finding any aluminum bigger than 12 x 24.
Thanks and its actually fashioned after the AAL version. Yes its aluminum.

I’ll be going back after this weekends Mojave road trip and putting bends in the front and rear to stiffen it up because its only 3/32” vs what it should be of 1/8”. I had it left over from a previous project so all I spent on it was around $85 for the amazon rails and stainless hardware from McFadden Dale.

I buy the majority of my metal from Industrial Metal Supply and most times the stuff in the rems section is just what I need.
 
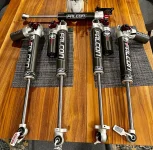
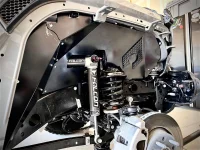
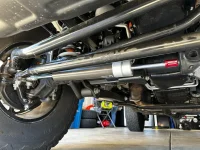
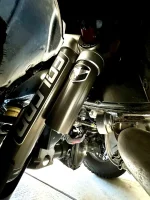
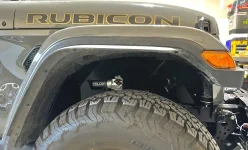
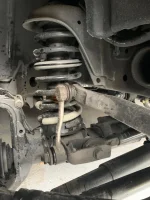
Got my 392 an early christmas present... Falcon 3.3 SP2's all around and their adjustable steering stabilizer, as well as Artec Industries inner fenders. Don't mind the scratches in the fender rattle can job, those were touched up after it was all buttoned up. Stock inner fender liners were trimmed to match up with the Artec fenders as well.

I've currently got the shocks set as follows:

SP2 Setting - Cold/Soft
Primary Adjustment Dial - 1/Soft
Micro Adjustment Dial - 4
Steering - Medium

Feels great, though I need to do some more experimentation. On my current settings, I'd say the 392 feels a tad firmer than stock without being harsh, while feeling much more planted in corners and most of the play in the steering gone. Very pleased thusfar!

signal-2022-11-28-084624_002.jpegsignal-2022-11-24-145359_002.jpegsignal-2022-11-28-084624_003.jpegsignal-2022-11-28-084624_004.jpegsignal-2022-11-28-085211_002.webp
 
Got my 392 an early christmas present... Falcon 3.3 SP2's all around and their adjustable steering stabilizer, as well as Artec Industries inner fenders. Don't mind the scratches in the fender rattle can job, those were touched up after it was all buttoned up. Stock inner fender liners were trimmed to match up with the Artec fenders as well.

I've currently got the shocks set as follows:

SP2 Setting - Cold/Soft
Primary Adjustment Dial - 1/Soft
Micro Adjustment Dial - 4
Steering - Medium

Feels great, though I need to do some more experimentation. On my current settings, I'd say the 392 feels a tad firmer than stock without being harsh, while feeling much more planted in corners and most of the play in the steering gone. Very pleased thusfar!

View attachment 15188View attachment 15187View attachment 15189View attachment 15190View attachment 15192
@Stonehide Thanks for posting! I assume you're using the stock springs. Do you notice a difference with these shocks set the way you have them on-road? I'm debating whether to get an AEV lift for a tighter suspension or whether swapping out shocks is enough.
 
@Stonehide Thanks for posting! I assume you're using the stock springs. Do you notice a difference with these shocks set the way you have them on-road? I'm debating whether to get an AEV lift for a tighter suspension or whether swapping out shocks is enough.
Of course! Still on stock springs. Definitely a big difference with on-road feel. I wouldn't go so far as to say it feels like a sports car, but the 392 feels tighter, there's way less body roll in the corners, and less "floaty" in general. I'd be hesitant to go to a stiffer spring without adding a consumerate amount of weight to the jeep to compensate.
 
Of course! Still on stock springs. Definitely a big difference with on-road feel. I wouldn't go so far as to say it feels like a sports car, but the 392 feels tighter, there's way less body roll in the corners, and less "floaty" in general. I'd be hesitant to go to a stiffer spring without adding a consumerate amount of weight to the jeep to compensate.
Good to know the new shocks making a difference. I was actually considering the Clayton 392 performance coil springs https://www.claytonoffroad.com/product/jeep-wrangler-392-performance-coil-package and according to the video, you'll gain 1/2" front height and 1/4" rear. The stiffer springs will also improve the on-road handling. Every time I drive through the speed bump near my son's school, my 392 shakes badly and that annoys the passengers. Feels like driving my old Jeep GC Summit with Air suspension. So I'm wondering if I should go with new shocks or the stiffer coil springs. Any insights?
 
Good to know the new shocks making a difference. I was actually considering the Clayton 392 performance coil springs https://www.claytonoffroad.com/product/jeep-wrangler-392-performance-coil-package and according to the video, you'll gain 1/2" front height and 1/4" rear. The stiffer springs will also improve the on-road handling. Every time I drive through the speed bump near my son's school, my 392 shakes badly and that annoys the passengers. Feels like driving my old Jeep GC Summit with Air suspension. So I'm wondering if I should go with new shocks or the stiffer coil springs. Any insights?
Hmm, I haven't heard of those. I might look into those when I bump up to 37's for just a bit more height.

When you say "shakes badly" what do you mean? Is it more that the body is rolling (front to back or side to side rocking) or that you feel a harsh hit (jarring, rattling)?

These will help with any sense of body roll, but if you're feeling a harsh hit, you'll probably want to look into something like https://accutuneoffroad.com/ and chat with them about a custom valving on some of their fox or king shocks. Falcons are great for real slow crawling and smooth street handling, but not as great at handling big potholes or speed bumps at moderate+ speed.
 
Hmm, I haven't heard of those. I might look into those when I bump up to 37's for just a bit more height.

When you say "shakes badly" what do you mean? Is it more that the body is rolling (front to back or side to side rocking) or that you feel a harsh hit (jarring, rattling)?

These will help with any sense of body roll, but if you're feeling a harsh hit, you'll probably want to look into something like https://accutuneoffroad.com/ and chat with them about a custom valving on some of their fox or king shocks. Falcons are great for real slow crawling and smooth street handling, but not as great at handling big potholes or speed bumps at moderate+ speed.
More like side to side rocking. Sorry I didn’t describe very well.

I looked at the front bump stop, really not much room for uptravel and the bump tower quite tall.
 

Attachments

  • 16B26C78-1885-46CF-851D-4E2EB9DE2627.webp
    16B26C78-1885-46CF-851D-4E2EB9DE2627.webp
    166.6 KB · Views: 53
More like side to side rocking. Sorry I didn’t describe very well.

I looked at the front bump stop, really not much room for uptravel and the bump tower quite tall.
I'm thinking that the restriced travel on the pasenger side is due to the close proximity of the oil filter in relation to the moving suspension and steering parts.🤷‍♀️
 
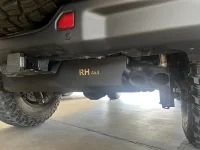
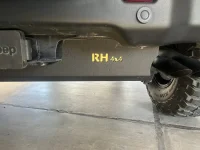
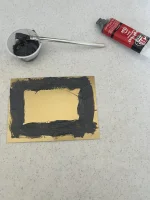
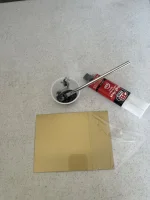
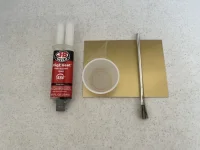
Added some color to the RH 4x4 cut-out in the Rock Hard muffler skid plate I installed a month or so ago. Obtained a 4.5"x6"piece of Sublimation Brass from a local graphics shop and epoxied it to the skid plate covering the cut-outs from the inside of the skid plate. I anticipate that the piece will darken somewhat from heat and age so it should more closely match the 392 bronzish theme.
 

Attachments

  • IMG_3836.webp
    IMG_3836.webp
    103.2 KB · Views: 82
  • IMG_3835.webp
    IMG_3835.webp
    117.5 KB · Views: 86
  • IMG_3834.webp
    IMG_3834.webp
    150.6 KB · Views: 80
  • IMG_3833.webp
    IMG_3833.webp
    119.9 KB · Views: 71
  • IMG_3832.webp
    IMG_3832.webp
    109.5 KB · Views: 76
Last edited:
Installed…
  • AAL drivers side rear seat delete low profile
  • AAL shelf
  • Custom wood platform
  • Dual 30AH with custom hold down bracket.
Before anyone gets on me about the shelf… yes I know the shelf is backwards. It was installed this way on purpose for a couple reasons. First I prefer the plano boxes to be centered under roll cage and second I prefer to have things set forward more for future custom work/mods on the front of the shelf along with some hanging drawers.
Thought I'd share my field experience with my new/current battery setup as installed and detailed earlier in the thread.

For my weekend trip driving/camping the Mojave Road (~450 miles total round trip with ~16+ seat hours) I ended up adding an eco-worthy charger. I plugged it into the onboard 120V outlet AND connect it directly to one of my two (not yet parallel) batteries so it could charge while driving. On that same battery I have a wired CLA where I plugged my CFX3 45 cooler into.

The charger kept my battery topped off while the cooler was plugged in during drive time. The cooler ran overnight with no more charging while we camped. To my surprise, the battery was still at ~100% the next morning before hitting the road after running the cooler for 17 hours. Granted, it was ~35 degrees out but still.

The charger cost just $90 compared to a redarc or wagan at $400+ so I'd say Im gonna definitely get my monies worth and it didn't require any custom hardwiring.
 
Thought I'd share my field experience with my new/current battery setup as installed and detailed earlier in the thread.

For my weekend trip driving/camping the Mojave Road (~450 miles total round trip with ~16+ seat hours) I ended up adding an eco-worthy charger. I plugged it into the onboard 120V outlet AND connect it directly to one of my two (not yet parallel) batteries so it could charge while driving. On that same battery I have a wired CLA where I plugged my CFX3 45 cooler into.

The charger kept my battery topped off while the cooler was plugged in during drive time. The cooler ran overnight with no more charging while we camped. To my surprise, the battery was still at ~100% the next morning before hitting the road after running the cooler for 17 hours. Granted, it was ~35 degrees out but still.

The charger cost just $90 compared to a redarc or wagan at $400+ so I'd say Im gonna definitely get my monies worth and it didn't require any custom hardwiring.
I am not certain but I think a DC-DC charger would be more efficient.

I could find it but can you post a link for the charger?

I did some experiments with my Jackery 1000 knockoff to determine energy requirements for my Dometic CFX3 45. I found in a 75 degree controlled environment it takes about 12 Watt Hours per hour to maintain 34 internal degrees. Your 30 AH battery has 360 Watt Hours so it should be good for about 30 hours in the same 75 degree environment, assuming a 100-0% discharge which is not recommended for battery longevity. Maybe I did not explain that well but I hope the data is useful.
 
I am not certain but I think a DC-DC charger would be more efficient.

I could find it but can you post a link for the charger?

I did some experiments with my Jackery 1000 knockoff to determine energy requirements for my Dometic CFX3 45. I found in a 75 degree controlled environment it takes about 12 Watt Hours per hour to maintain 34 internal degrees. Your 30 AH battery has 360 Watt Hours so it should be good for about 30 hours in the same 75 degree environment, assuming a 100-0% discharge which is not recommended for battery longevity. Maybe I did not explain that well but I hope the data is useful.
 
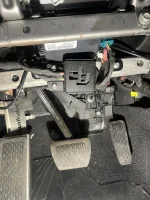
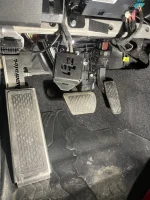
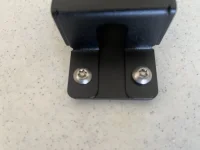
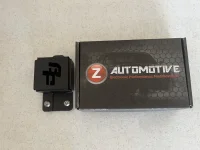
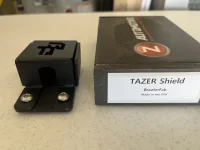
Received the BrawlerFab Tazer Shield and installed it onto the Jeep's Tazer Mini. It is temporarily being held in place by velcro until I can obtain suitable hardware to secure it to the metal cross member under the dash. I'm thinking about drilling a countersunk hole in the base of the shield and securing it to the metal piece using a machine screw with a taperd head so it mounts flush to the inside of the base. I'll reply to this post with photos and description of what I do to secure the shield to the cross member after I get it done.
 

Attachments

  • IMG_3857.webp
    IMG_3857.webp
    192.6 KB · Views: 98
  • IMG_3855.webp
    IMG_3855.webp
    298.8 KB · Views: 100
  • IMG_3854.webp
    IMG_3854.webp
    49 KB · Views: 104
  • IMG_3853.webp
    IMG_3853.webp
    132.2 KB · Views: 88
  • IMG_3852.webp
    IMG_3852.webp
    66.3 KB · Views: 99
Received the BrawlerFab Tazer Shield and installed it onto the Jeep's Tazer Mini. It is temporarily being held in place by velcro until I can obtain suitable hardware to secure it to the metal cross member under the dash. I'm thinking about drilling a countersunk hole in the base of the shield and securing it to the metal piece using a machine screw with a taperd head so it mounts flush to the inside of the base. I'll reply to this post with photos and description of what I do to secure the shield to the cross member after I get it done.
Mine is ordered, not received yet.
 
Received the BrawlerFab Tazer Shield and installed it onto the Jeep's Tazer Mini. It is temporarily being held in place by velcro until I can obtain suitable hardware to secure it to the metal cross member under the dash. I'm thinking about drilling a countersunk hole in the base of the shield and securing it to the metal piece using a machine screw with a taperd head so it mounts flush to the inside of the base. I'll reply to this post with photos and description of what I do to secure the shield to the cross member after I get it done.
I dont have a Tazer but plan to get one and like the idea of adding a solution that prevents it from being unplugged by a would be thief trying to bypass the security code. Im curious though... is there not a better orientation to install it in that makes it look less aftermarket or that even hides it/makes it more difficult to get to? I understand that the kick panel will cover it but still.

Also, for those considering any type of security/disablement solutions either DIY or aftermarket, it might be important to know that I recently discovered (owners manual) that one can put the 4wd shifter into neutral which effectively disengages both driveshafts even when the vehicle is in park making it possible to push/pull the rig onto a trailer without much resistance. I have not yet confirmed it to be true but I thought Id share all the same just in case it is.
 
I dont have a Tazer but plan to get one and like the idea of adding a solution that prevents it from being unplugged by a would be thief trying to bypass the security code. Im curious though... is there not a better orientation to install it in that makes it look less aftermarket or that even hides it/makes it more difficult to get to? I understand that the kick panel will cover it but still.

Also, for those considering any type of security/disablement solutions either DIY or aftermarket, it might be important to know that I recently discovered (owners manual) that one can put the 4wd shifter into neutral which effectively disengages both driveshafts even when the vehicle is in park making it possible to push/pull the rig onto a trailer without much resistance. I have not yet confirmed it to be true but I thought Id share all the same just in case it is.
I have not made a final determination as to where to mount the Tazer shield yet but a main consideration is ease of access for those occassions when I need to un-marry the Tazer to return the Jeep to 'stock' operational mode. There are other areas of the underdash frame that might be geeod candidates, just need to fence off some time to dedicate to finishing this project up.

As far as putting the transfer into neutral, I'm thinking the same thing about actually making it easier to push a vehicle onto a trailer much like pulling the transmission disengament strap putting the vehicle into neutral for the same purpose. Another consideration is that the park function of the transmission would not be applied relying soley on the park brake to keep it in place when parked.
 
Added Rock Hard Slider-Steps and Maximus-3 XLP Winch Guard. No winch yet but will in a few months.

I wanted something that would act as a mudflap (to some degree but still be a Rock Slider). DIdn't really need a step but it does work well that way too. Maximus-3 Hoop had been out of stock for several months. When I found they had an inventory, I ordered right away.

Only running 32" Tires for the Winter (Nokian Studded have Super Grip).

IMG_8330_resized.jpg


I had the Slider Rhino Lined.
IMG_8349_resized.jpg

IMG_8343_resized.jpg
 
Installed my Borla.
I’m planning on a Borla system in a few weeks, I also want to add the Maximus 3 rear tow loops but I’m not sure they will fit together. Definitely going with the exhaust though.
Did you go with the S type or the ATAK?
 
I’m planning on a Borla system in a few weeks, I also want to add the Maximus 3 rear tow loops but I’m not sure they will fit together. Definitely going with the exhaust though.
Did you go with the S type or the ATAK?
I did the ATAK. It went far better than I was expecting as far as install, did it myself on the ground with just a creeper. About 4 hours but I had football on too.

Also surprisingly close to the factory tow hook so may not work with the Maximus, but don’t know for sure.
 

Create an account or login to comment

Join now to leave a comment enjoy browsing the site ad-free!

Create account

Create an account on our community. It's easy!

Log in

Already have an account? Log in here.

Latest Discussions

Back
Top