GuruMan's 20a build

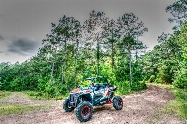
Today's adventure....

IMG_2899.jpg
IMG_2900.jpg
IMG_2901.jpg
IMG_2902.jpg
IMG_2907.jpg
IMG_2909.jpg
 
I enabled the homelink buttons to work before I start it

That might be a security risk when the Jeep is not garaged: if a thief breaks the Jeep he/she can open the garage door and potentially get in your house.
 
I enabled the homelink buttons to work before I start it

That might be a security risk when the Jeep is not garaged: if a thief breaks the Jeep he/she can open the garage door and potentially get in your house.
Once they meet the Belgian Malinois... they will leave on their own accord... if they can.
87870804_263045168017751_8746187336179515392_n.jpg


Seriously, it's always garaged at the house.
 
I wrestled the RockSlide Engineering power steps on this weekend.... Man what a huge project for what it is. Manhandling those hundred pound steps into place to just have them not quite line up, then contort your hands into the access holes to tighten the nuts.

And the stupid brackets that mount to the body bolt..... Geesh. WHY?

Wiring everywhere... requiring you to strip the trim out of both sides. Stick on sensors that kind of don't stick. The wiring would have been so much easier if they just tied into the factory door/dome light circuit. And the directions on running the rear portion of the wiring was vague to say the least.... some thing like just run the wire over the frame and secure to the crossmember,with no mention at all about how the fuel tank is right there in the way....

And you cannot really do it in stages, running the wires without mounting the steps seems weird to just leave the wires hang.... plus I was never quite sure if everything would reach. And mounting the steps first puts them in the way when routing the wires....

I managed to get them mounted and wired and added the optional lights and the doorless kit, in two afternoons of fighting with it.

I still have the external skids to bolt on.... that'll wait for another day. Hopefully it's a bit easier than this whole dance of getting the steps and wiring down.

I were a drinking man, I'd need a drink.


IMG_3554.jpg
IMG_3553.jpg
IMG_3552.jpg
IMG_3551.jpg


IMG_3555.jpg
 
Last edited:
I still have the external skids to bolt on.... that'll wait for another day. Hopefully it's a bit easier than this whole dance of getting the steps and wiring down.

I were a drinking man, I'd need a drink.
I did this on mine right after Thanksgiving. I had a harder time putting the skid plates on them than installing the sliders. Trying to get the rivet holes lined up and be able to get the bolt holes on the bottom lined up. And then once I had everything started, the middle bolts underneath took me a while to get tightened up because there is hardly any room to move between the slider /skid and the frame and also took a bit to get the right combination of socket, extension and rachet that would fit. Still could only rachet a couple of degrees each time. I was doing it without lifting it up though, so don't know if it would have been easier if I would have put it on the lift instead.
 
I did this on mine right after Thanksgiving. I had a harder time putting the skid plates on them than installing the sliders. Trying to get the rivet holes lined up and be able to get the bolt holes on the bottom lined up. And then once I had everything started, the middle bolts underneath took me a while to get tightened up because there is hardly any room to move between the slider /skid and the frame and also took a bit to get the right combination of socket, extension and rachet that would fit. Still could only rachet a couple of degrees each time. I was doing it without lifting it up though, so don't know if it would have been easier if I would have put it on the lift instead.
Well, that's not encouraging at all. Thanks for the heads up.
 
I did the steps and armor all in one day. And I don't disagree with any of your post. It wasn't a particularly hard install, but it was tedious completing all the steps just the right way. And the holes in my pinch welds were off by just enough that attaching the steps took more than one try because I had to slightly ream them out.

The armor was a bit of a bear, just cause there is a lot of holes to line up. Make sure you drill out the rivets on the sliders for the RSE badges. The badges get removed from the sliders since there are new badges on the armor pieces. Once things are all lined up, it's just a matter of patience and taking your time getting all the bolts tightened up. Hammering the rivets has a satisfying feel to it! Having a helper is a must - there's just too much to line up and they weigh enough that doing it by yourself just isn't practical.

Good luck, they're definitely worth it.
 
I installed the gatekeeper Offroad knuckle light brackets and dropped on a set of Morimoto 1banger lights in the combo pattern.

I'm not super happy with the result.... the lights are up high enough that the bumper is blocking pretty much all of the useable light.

I might try removing the bumper ends, or switching out to a wider light pattern. With more lift and/or a stubby bumper it's be better.

I really like the idea though.


IMG_3561.jpg
IMG_3560.jpg
IMG_3559.jpg
 
Worked on getting the optional skid plates onto my RockSlide Engineering slider steps (3.0).

Not as bad as I was expecting.... other than kind of horrible directions. I was pretty confused when I started. It turns out they gave me two hardware kits..... so I had a bunch of extra hardware I wasn't sure what to do with... and even then, some of the hardware in each kit was not used.

But it was pretty easy.

Here's the low-down.

The skid is held in place by the rear two bolts on the front body/step mount. take out the old ones, and new, longer ones were provided in the JL Hardware "supplement" bag. I reused the washers off the old bolts.

There is a single round-head stove bolt near the center of the skid, approximately under the "B" pillar, and another stove bolt at the very rear step mount (accessible through the wheel well).

The two front bolts were a no-brqainer. I had issues with the powder coating in the square holes for the stove bolts though, and getting them lined up in the square hole was a challenge. I ended up just lining it up, and cranking the nut down.

The center bolt has a nut that gets threaded on from inside the step frame.... not super easy to reach, but some dextrous fingertip work prevailed in short order. Tightening it was easiest with a 1/4 inch ratchet handle and a deep well 1/2 inch socket.

Getting the rivets into the sides was not point-and-shoot either, and the aforementioned powder coating, I believe, caused some variance in how everything lined up.

I decided to take a hand file to each rivet and file a bit of a 45 degree flat onto the end that goes in the step. Then I slipped a small socket over the "pin" and used a hammer to drive it in. the bevel caused it to slip right in place without much drama. Then I just hammered the pin in as directed.

All-in-all, it took about an hour, thanks to a hydraulic lifting platform table, which made getting the skids in place pretty event free.

Here's some pics....

IMG_3613.jpg
IMG_3612.jpg
IMG_3611.jpg
IMG_3610.jpg
IMG_3609.jpg
IMG_3608.jpg
 
Posting for some poor future Jeeper who thinks his compressor died.:

I went to use the built-in air compressor in my 20a to top off my tires, which were low due to the colder weather.

It didn't work.... compressor ran, but no air came out of the hoses....

I decided to pull the tailgate plastic cover off to see why it was broken. It turns out there is a quick disconnect fitting right behind the control panel that ties the compressor into the air manifold. It was disconnected, probably from pulling the panel to run some antenna wires back in summer.

I plugged it back in, replaced the panel... easy fix.
 

7% off 2024 Jeep Wrangler 392 Granger Motors Just Bolt Ons.com MARK CDJR in Lake Charles Louisiana Underground Graphics

Latest Discussions

Back
Top