Nismo1013’s RV8ICON Build

nismo1013

Well-known member
Joined
Jul 5, 2022
Messages
112
Reaction score
137
Location
Winter Park, FL
Current Rides
2023 392XR
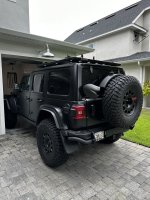
Figured I’d document my journey in case someone finds it helpful. Still a work in progress but feels like I’m more than half way there. Will try to group posts by topic if I can. Will start with picking the Jeep up from Koon’s, which was a straight forward and pleasant experience.
 

Attachments

  • IMG_8880.jpeg
    IMG_8880.jpeg
    354.5 KB · Views: 126
  • IMG_8878.jpeg
    IMG_8878.jpeg
    292.2 KB · Views: 46
Home and safely tucked away back in FL. Those first couple hundred miles of break-in were a real test of the will!
 

Attachments

  • IMG_8899.jpeg
    IMG_8899.jpeg
    226.6 KB · Views: 18
First project was installing the Goose Gear platform. Very straightforward install. I was torn between this and the AAL platform but ultimately picked this for 2 reasons: 1. No holes in the platform (AAL seemed more modular but also more holes) and 2. I felt like the metal platform from AAL might amplify, or least not deaden, noise more than the wood platform from Goose Gear.
 

Attachments

  • IMG_8955.jpeg
    IMG_8955.jpeg
    351 KB · Views: 61
  • IMG_8956.jpeg
    IMG_8956.jpeg
    328 KB · Views: 49
  • IMG_8957.jpeg
    IMG_8957.jpeg
    358.1 KB · Views: 49
  • IMG_8958.jpeg
    IMG_8958.jpeg
    313.8 KB · Views: 63
  • IMG_8959.jpeg
    IMG_8959.jpeg
    321.1 KB · Views: 62
Last edited:
Next up was test fitting the National Luna 50 fridge. Some might not understand or agree with that choice but a freezer was important to me as I live and primarily camp in Florida, where an ice cream sandwich is worth it’s weight in gold in the summer. I knew this would not fit in the driver side without putting the rear seats down but this is my primary vehicle and I have 2 kids, so that wasn’t practical. I thought it would fit in the passenger side but was going to be tight based on my measurements. I was right 😅
 

Attachments

  • IMG_8981.jpeg
    IMG_8981.jpeg
    327.4 KB · Views: 48
  • IMG_8980.jpeg
    IMG_8980.jpeg
    315.3 KB · Views: 48
  • IMG_8978.jpeg
    IMG_8978.jpeg
    173.1 KB · Views: 44
  • IMG_8976.jpeg
    IMG_8976.jpeg
    212.1 KB · Views: 48
Then it was time to power what was sure to be a power-hungry fridge/freezer combo in the Florida heat. I chose the Expion360 120Ah group 27 battery for the power it packed into its size and decided to mount it under the rear passenger seat using the Genesis Offroad dual battery kit. I did not need the power hub (more on that later) but didn’t see an option to only buy the battery mount on their site. A quick email to them and they fixed me right up.

Unfortunately while Genesis Offroad’s site says it will fit a group 27 battery, I could not get the Expion360 to fit. Checked all the dimensions and it should have gone but no dice. Even emailed Genesis to try to troubleshoot. They responded to my first email but then went dark after my second. 🤷🏻‍♂️

My issue was the frame under the rear seat was coming into contact with the battery case and resulted in a ~1.5” gap between the rear seat mount and the floor board. Genesis said it would go, I just needed to squeeze it in. 200lbs of me wouldn’t do it. Since this was the only place I could fit a battery the answer, unfortunately, was to get something smaller. More on that later.
 

Attachments

  • IMG_9071.jpeg
    IMG_9071.jpeg
    199.7 KB · Views: 41
  • IMG_9068.jpeg
    IMG_9068.jpeg
    272 KB · Views: 41
  • IMG_9064.jpeg
    IMG_9064.jpeg
    244.2 KB · Views: 43
  • IMG_9034.jpeg
    IMG_9034.jpeg
    307.4 KB · Views: 43
  • IMG_9033.jpeg
    IMG_9033.jpeg
    362.8 KB · Views: 40
  • IMG_9032.jpeg
    IMG_9032.jpeg
    272.6 KB · Views: 38
  • IMG_9029.jpeg
    IMG_9029.jpeg
    298.6 KB · Views: 36
  • IMG_9027.jpeg
    IMG_9027.jpeg
    353.1 KB · Views: 40
Last edited:
I was planning on a 2-week camping trip out West and pressed for time, so after the discouraging development with the group 27 battery I started contingency planning. Good to know a Yeti Tundra 45 fits on a Goose Gear fridge slide pretty well 😅
 

Attachments

  • IMG_9076.jpeg
    IMG_9076.jpeg
    273.3 KB · Views: 28
  • IMG_9075.jpeg
    IMG_9075.jpeg
    222.8 KB · Views: 28
Last edited:
Also FYI, an Eagle Creek packing cube fits perfectly in the 392 rear cubbie ✌🏻
 

Attachments

  • IMG_9081.jpeg
    IMG_9081.jpeg
    457.6 KB · Views: 38
After that, I had the 392 fully wrapped in Suntek PPF and ceramic coated, including the wheels and wheel wells. I had my last Jeep done the same way and loved it, so this was a no-brainer for me. My wife tried to accuse me of making the Jeep look like a gun. I took it as a compliment 😁 
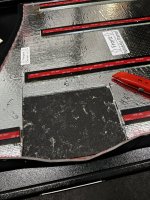
In any case, the PPF is a lifesaver when it comes to pinstripes.
 

Attachments

  • IMG_9188.jpeg
    IMG_9188.jpeg
    182.4 KB · Views: 68
  • IMG_9203.jpeg
    IMG_9203.jpeg
    212.3 KB · Views: 68
  • IMG_9211.jpeg
    IMG_9211.jpeg
    143.2 KB · Views: 71
  • IMG_9225.jpeg
    IMG_9225.jpeg
    373.5 KB · Views: 70
Last edited:
Literally the day after the 392 got back from PPF and ceramic coating, I shipped it up to AEV for a JL370 upfit. Could have done this from the dealer but for some hair brained reason I didn’t 🤪

Managed to get a good look underneath as it was loaded onto the truck.
 

Attachments

  • IMG_9226.jpeg
    IMG_9226.jpeg
    302.1 KB · Views: 53
  • IMG_9230.jpeg
    IMG_9230.jpeg
    358.9 KB · Views: 39
  • IMG_9231.jpeg
    IMG_9231.jpeg
    360.3 KB · Views: 37
  • IMG_9232.jpeg
    IMG_9232.jpeg
    321.5 KB · Views: 51
  • IMG_9233.jpeg
    IMG_9233.jpeg
    302.5 KB · Views: 54
Tried to keep myself busy with other projects while I waited for it to come back.

Hung the half doors using Rugged Ridge door mounts. I’ll get them wrapped in PPF this fall.

Worked on getting my Zarges cases organized. Installed a Goose Gear plate and Pelican TrekPak divider system to stay organized. I’m using these instead of a drawer system to give myself some flexibility and ability to remove when not needed. I also pull these out to use as tables at camp. Really happy with them.
 

Attachments

  • IMG_9249.jpeg
    IMG_9249.jpeg
    175 KB · Views: 31
  • IMG_9036.jpeg
    IMG_9036.jpeg
    193.9 KB · Views: 30
  • IMG_9041.jpeg
    IMG_9041.jpeg
    319.8 KB · Views: 28
  • B3878C7A-9B63-4437-AFD9-2068F2769CE6.jpeg
    B3878C7A-9B63-4437-AFD9-2068F2769CE6.jpeg
    399.6 KB · Views: 31
Jeep came back from AEV in about 45 days (quicker than I expected) and I couldn’t have been more pleased. I was a little concerned about road manners on the 37”s but it was just like I had read others reporting… just as good as (if not a little better than) OEM.

Also opted for the painted hardtop interior option. Jeep really should offer this as a factory option. Completely elevated the look and feel of the interior.
 

Attachments

  • IMG_9569.jpeg
    IMG_9569.jpeg
    337 KB · Views: 68
  • IMG_9571.jpeg
    IMG_9571.jpeg
    302.8 KB · Views: 67
  • IMG_9597.jpeg
    IMG_9597.jpeg
    169.7 KB · Views: 67
  • IMG_9624.jpeg
    IMG_9624.jpeg
    416.2 KB · Views: 69
Once the Jeep was back I could get back to solving my house battery issue. I picked up a Dakota Lithium 135Ah group 24f battery despite a few negative reviews I saw online (specifically testing their BMS) for 3 reasons: 1. It had the largest Ah I could find in a group 24 battery (larger than the Expion360 group 27 even!), 2. It came in the “f” configuration so terminals were swapped and gave more clearance from potential grounding out of the positive terminal on the seat frame, and 3. It was on sale 😅

I mentioned I didn’t need the Genesis Offroad power hub earlier; that was because I already had a Redarc BCDC1225 that I planned to install under the driver side rear passenger seat. I ended up tapping into the rear cigarette lighter plug and switching the fuse position for it for ignition. A lot of work for that little pink and green wire. But I think it came out pretty clean (did I mention I hate wiring?).
 

Attachments

  • IMG_9602.jpeg
    IMG_9602.jpeg
    232.3 KB · Views: 27
  • IMG_9797.jpeg
    IMG_9797.jpeg
    228.5 KB · Views: 26
  • IMG_9798.jpeg
    IMG_9798.jpeg
    155.5 KB · Views: 27
  • IMG_9799.jpeg
    IMG_9799.jpeg
    132.2 KB · Views: 27
  • IMG_9800.jpeg
    IMG_9800.jpeg
    150.2 KB · Views: 26
  • IMG_9802.jpeg
    IMG_9802.jpeg
    161.6 KB · Views: 25
  • IMG_9803.jpeg
    IMG_9803.jpeg
    220.5 KB · Views: 28
  • IMG_9814.jpeg
    IMG_9814.jpeg
    417.2 KB · Views: 32
  • IMG_9810.jpeg
    IMG_9810.jpeg
    391.7 KB · Views: 30
Then it was time for the roof rack. I chose the Maximus-3 with the short Pioneer Platform for 3 reasons: 1. The Maximus-3 seemed to be the lowest profile roof rack I could find, 2. It had the highest dynamic weight rating of any racks that interacted with the hardtop that I could find, and 3. I liked the looks / proportions of the short platform vs the long platform. I also figured the short platform would force me to keep the weight down.

I read a lot of mixed reviews about the installation instructions from Maximus-3, mostly that they were confusing and not clear. I found them to be straightforward but I will say there is no stress like drilling a hole in the roof of your brand new $100k+ Jeep 😅

I installed the roof rack by myself but the job of lifting and placing the rack on the roof would be much easier with 2 people.
 

Attachments

  • IMG_9722.jpeg
    IMG_9722.jpeg
    301.2 KB · Views: 35
  • IMG_9726.jpeg
    IMG_9726.jpeg
    310.1 KB · Views: 27
  • IMG_9851.jpeg
    IMG_9851.jpeg
    163.5 KB · Views: 29
  • IMG_9852.jpeg
    IMG_9852.jpeg
    134.6 KB · Views: 28
  • IMG_9859.jpeg
    IMG_9859.jpeg
    128.9 KB · Views: 31
  • IMG_9855.jpeg
    IMG_9855.jpeg
    219.2 KB · Views: 36
  • IMG_9856.jpeg
    IMG_9856.jpeg
    301.7 KB · Views: 40
  • IMG_9858.jpeg
    IMG_9858.jpeg
    290.7 KB · Views: 39
I also mounted Pelican cargo cases the the Pioneer Platform. I’m a big fan of Pelican’s other products and when they released the RFMT2 mount, I made my mind up that these were the cargo case for me. The BX85S case also just happened to perfectly fit my tent poles (to within 0.5”).

The mounts Pelican offers aren’t really intended for Pioneer Platforms (I think they’re designed for Front Runners) so I ended up having to drill through the platform for a few brackets. They’re secure but I doubt I’ll ever remove them from the platform as a result.

I also installed a Maximus-3 ladder on one side.

I had pieced together what I thought the overall height of the Jeep would be after all of these mods and came up with what I estimated was 1.5” of clearance for the garage. I was right… again 😅 Jeep is 84.5” tall with the cases mounted.
 

Attachments

  • IMG_9889.jpeg
    IMG_9889.jpeg
    265 KB · Views: 45
  • IMG_9863.jpeg
    IMG_9863.jpeg
    284.8 KB · Views: 49
  • IMG_9861.jpeg
    IMG_9861.jpeg
    272.5 KB · Views: 46
  • IMG_9743.jpeg
    IMG_9743.jpeg
    275.9 KB · Views: 42
  • IMG_9738.jpeg
    IMG_9738.jpeg
    198.2 KB · Views: 43
Onboard air by way of the Kraken. Very straightforward install made easier by the fact that I ran power from the house battery under the rear seat instead of having to pass through the firewall or floorboard to access the main battery.
 

Attachments

  • IMG_9899.jpeg
    IMG_9899.jpeg
    349 KB · Views: 33
  • IMG_9897.jpeg
    IMG_9897.jpeg
    334.7 KB · Views: 33
  • IMG_9896.jpeg
    IMG_9896.jpeg
    241.3 KB · Views: 32
I installed Hotheads headliners and Sound Assassin strips on my last JLUR and loved them, so naturally installed them on the 392. The Maximus-3 roof rack mounting brackets complicated the headliner install but luckily Hotheads has a great video tutorial on their YouTube page. I’m not an upholstery guy but was pleased with how they came out. Also, gotta say the painted interior of the hardtop with the headliner looks ::chef’s kiss::
 

Attachments

  • IMG_9927.jpeg
    IMG_9927.jpeg
    382.2 KB · Views: 36
  • IMG_9929.jpeg
    IMG_9929.jpeg
    386.8 KB · Views: 32
  • IMG_9930.jpeg
    IMG_9930.jpeg
    429.3 KB · Views: 33
  • IMG_9938.jpeg
    IMG_9938.jpeg
    228.3 KB · Views: 33
  • IMG_9943.jpeg
    IMG_9943.jpeg
    224.7 KB · Views: 33
  • IMG_9933.jpeg
    IMG_9933.jpeg
    258.5 KB · Views: 36
  • IMG_9935.jpeg
    IMG_9935.jpeg
    198.5 KB · Views: 36
  • IMG_9944.jpeg
    IMG_9944.jpeg
    297.7 KB · Views: 32
  • IMG_9945.jpeg
    IMG_9945.jpeg
    275.2 KB · Views: 34
Cleaned up wiring on the fridge using Arb’s cable guide. Super easy and no more worries about pinched wires 😎
 

Attachments

  • IMG_9958.jpeg
    IMG_9958.jpeg
    276.3 KB · Views: 28
  • IMG_9959.jpeg
    IMG_9959.jpeg
    225.2 KB · Views: 28
  • IMG_9962.jpeg
    IMG_9962.jpeg
    303.1 KB · Views: 28
We won’t talk about what I did but let’s just say the Dakota Lithium battery’s BMS did not perform when I was installing the shunt for the Expion360 battery monitor (to be clear, I made a boo boo). They say you can’t fix stupid. As a result, I had to buy my 3rd lithium battery in 3 months.

After having felt the fit and finish between Expion360 and Dakota Lithium, I decided to buy another Expion360. This time I got the group 24 95Ah. I had a mini panic attack when installing as it did not immediately fit. After some sweating and questioning what I was doing with my life, I finally got it in there. I guess I made VIP status with Expion360 because after my 2nd battery purchase from them in such a short time, they sent a few goodies.
 

Attachments

  • IMG_9971.jpeg
    IMG_9971.jpeg
    175.5 KB · Views: 18
I installed a Vector Offroad rear storage shelf, which is compatible with the Maximus-3 roof rack brackets. I opted for the storage shelf over the basket due to its lower profile.

I also picked up a Waterport Weekender and planned to mount on the roof rack but ran out of time before I had to leave for my trip out West. I ended up mounting to the trailer hitch because it was faster/easier, which was perfectly functional but lessens my departure angle. When I have some time this fall, I’ll move it up to the roof rack in the empty space between the Pelican cases.
 

Attachments

  • IMG_9989.jpeg
    IMG_9989.jpeg
    304.1 KB · Views: 38

7% off 2024 Jeep Wrangler 392 Granger Motors Just Bolt Ons.com MARK CDJR in Lake Charles Louisiana Underground Graphics

Latest Discussions

Back
Top