My 392xr

rubicon20032003

Well-known member
Joined
Apr 25, 2021
Messages
119
Reaction score
157
Location
Indiana pa
Current Rides
392
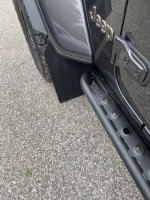
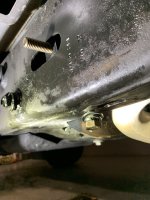
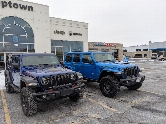
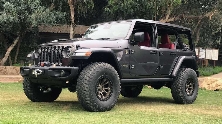
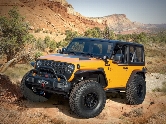
Picked it up about amonth ago.Got it of Mydealers lot for 5k sticker..Was owners wife’s demo .Had 400 miles .Atleast came with a max care 7/100 zero deductible warranty

C35009FD-B4A0-4A5E-8747-1FC012C78E1F.jpeg
 
Last edited:
Picked it up about amonth ago.Got it of Mydealers lot for 2k under sticker..Was owners wife’s demo .Had 400 miles .Atleast came with a max care 7/100 zero deductible warranty
Nice deal! Are those the Shrockworks rock sliders? I ordered from them and should be delivered next week.
 
Are those the Shrockworks rock sliders? I ordered from them and should be delivered next week.

Yes there build great ..They do a nice job on there products compared to other companies
Looks like you also have the rokblokz mud flaps. I had mine installed a few months ago and it works perfect with the rubi rails cutout in the front mud flaps. Not sure if I'll have to fill that cutout with the new sliders. Wish I had the sliders installed first.
 
Looks like you also have the rokblokz mud flaps. I had mine installed a few months ago and it works perfect with the rubi rails cutout in the front mud flaps. Not sure if I'll have to fill that cutout with the new sliders. Wish I had the sliders installed first.
No cutout in mine .If I was you I’d order a set of fronts without them
 

Attachments

  • 8DA52AA7-1087-495C-B5DC-A38EE7A0BB40.jpeg
    8DA52AA7-1087-495C-B5DC-A38EE7A0BB40.jpeg
    428.4 KB · Views: 64
Picked it up about amonth ago.Got it of Mydealers lot for 2k under sticker..Was owners wife’s demo .Had 400 miles .Atleast came with a max care 7/100 zero deductible warranty

Congrats! That's a really good deal in this crazy car market.
 
Congrats! That's a really good deal in this crazy car market.
Was ordered in Jan so didn’t have the new price increase.Have a 23 on order I might pass on.Don’t feel like paying more money for same Jeep different color
 
Yes there build great ..They do a nice job on there products compared to other companies
Sorry that I have to bother you with some installation issues of the Shrickworks sliders. I spent nearly all day to mess up with the fitment of the driver front side and passenger front side. I had to enlarge the opening of both the side and bottom holes but still couldn’t slide both into the front side. That 90 degree angled bracket just doesn’t fit the inside of the frame tube. And I could touch some reenforced welded metal plates inside. Not sure if this is because 392 has beefed up frame.

Did you have such issue?
Yes I pull front frame plate in frame.And used the threaded top part faster plate one bracket to holdup slider.And put a nut on it.And for bottom hole .I put a nut with a lock washer throw frame hole and put bolt up throw and tighten it thru frame hole.I couldn’t catch lower bracket nut ether.If I remember right I used two flat head screwdrivers thru frame hole to caught and hold nut to tighten it
 

Attachments

  • 67C57FBF-3EA3-4A7E-A5DA-C1181F5D9094.png
    67C57FBF-3EA3-4A7E-A5DA-C1181F5D9094.png
    787.2 KB · Views: 30
Last edited:
Yes I pull front frame plate in frame.And used the threaded top part faster plate one bracket to holdup slider.And put a nut on it.And for bottom hole .I put a nut with a lock washer throw frame hole and put bolt up throw and tighten it thru frame hole.I couldn’t catch lower bracket nut ether.If I remember right I used two flat head screwdrivers thru frame hole to caught and hold nut to tighten it
Thank you for the quick reply! I appreciate it! I’m trying to understand your solution. Did you cut the angled bracket into two pieces and only used the vertical piece with welded screw? The bottom one, sounds like you didn’t use the other piece (if you cut the original bracket into two) and just used separate nut fished into the frame to secure the bottom bolt.
 
Thank you for the quick reply! I appreciate it! I’m trying to understand your solution. Did you cut the angled bracket into two pieces and only used the vertical piece with welded screw? The bottom one, sounds like you didn’t use the other piece (if you cut the original bracket into two) and just used separate nut fished into the frame to secure the bottom bolt.
No I didn’t cut it left whole .When I tighten it it went to top of inside top of frame .Yes used a separate nut and lock washers in bottom part of frame and fisher it thru hole in front of we’re bottom bolt goes up thru lower bracket.Used my finger to get nut above hole..While holding pressure on it..Then got bolt started to thread
 
Last edited:
No I didn’t cut it left whole .When I tighten it it went to top of inside top of frame .Yes used a separate nut and lock washers in bottom part of frame and fisher it thru hole in front of we’re bottom bolt goes up thru lower bracket.Used my finger to get nut above hole..While holding pressure on it..Then got bolt started to thread
Oh? So you didn’t try to align (not possible in my case) the bottom welded nut of the bracket. Instead, you used a separate nut/washer inside the frame. Does this mean the inside bracket bottom is somewhat not holding? Because it has to move to the side or even up to give room to that separate nut?
 
Oh? So you didn’t try to align (not possible in my case) the bottom welded nut of the bracket. Instead, you used a separate nut/washer inside the frame. Does this mean the inside bracket bottom is somewhat not holding? Because it has to move to the side or even up to give room to that separate nut?
You must be using that long and bigger hole to insert that new nut/washer at bottom next to the round hole that is supposed to be aligned with the inside bracket.
 

Attachments

  • 2F84C8F7-DDF8-41D3-A5AC-20B5F104DF73.jpeg
    2F84C8F7-DDF8-41D3-A5AC-20B5F104DF73.jpeg
    217.4 KB · Views: 34
Thanks man for the insight! I was able to finish the install using the same approach! I may change to longer bolts for the bottom because I could feel the bolt is just about to flush with the top of inside nut. I want couple more threads over the nut.
 
Back
Top