Bombshell_392

TRMFAM

Well-known member
Joined
Sep 22, 2022
Messages
114
Reaction score
132
Location
OK
Current Rides
21 Bronco FE, 20 Raptor
I have been meaning to put together a build thread so here goes…asking for Grace because I am terrible at taking pictures!

A little history, I have a 1966 Ford Bronco that started out with a fire breathing 170 cubic inch 6 cylinder and 3 on the tree…it went through many builds from D30 front to D44 to finally a D60 / 14 bolt, 351W HO crate motor, C6 and NP205/203 doubler…but it NEVER had a top or doors one of the previous owners decided to fix the rusted A Pilar’s and cut them out and as with most projects promptly gave up and sold it. I do not plan to remove my doors or top…lived that as a daily driver for almost 2 years in the Bronco and zero desire to go back. As we had kids and they got out of car seats they really hated the Bronco…I was running 44” tires and we had been over on our side several times so not much I would not at least put tires on…we shifted to SxS and a toy hauler and the Bronco set for years and years. As our kids graduated and the last one is a Freshman in college I convinced my wife to get a Jeep and see if we still enjoy off-roading.

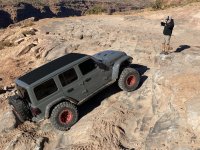
Ordered my Jeep September of 2022 from Grainger Jeep Rubicon 392 Sting Gray with SOT, half doors with premium uppers…at the time the XR package was not available. Jeep arrived in January and it was the easiest, fastest vehicle buying experience I have ever had…hats of to Grainger. Unfortunately I wanted to order a 2500 RAM in October 23 and with so many options the process was more difficult and I gave up trying over email and purchased locally.

These are the only pics I have of the Jeep from the first Month of ownership…did I mention I am terrible at taking pics?

Keep in mind when you go to the barn to get jack stands / tools you might pick up a stray barn cat…
 

Attachments

  • IMG_4401.jpeg
    IMG_4401.jpeg
    266 KB · Views: 309
  • IMG_4400.jpeg
    IMG_4400.jpeg
    222.3 KB · Views: 101
  • IMG_4640.jpeg
    IMG_4640.jpeg
    217 KB · Views: 98
Last edited:
I am a Project Manager for a living and love spreadsheets…truly the greatest software ever invented! I have multiple build alternatives and selected a mid-build…beef up the stock axles, mild lift and run 37’s to validate if the wife and I really want to do this enough to drop another 40K into axles, suspension and Atlas.

My wife and I did the majority of the work…so many great YouTube videos out there and companies like RockJock have a full step by step paper install backed up with videos for suspension and sway bars and finally any questions almost every vendor was available to answer my questions.

Knowing the Jeep was on order and my plan I took full advantage of Black Friday sales and ordered a ton of parts…my wife was losing it a bit as the dining room became my warehouse staging area! Once the Jeep arrived I immediately started on the suspension lift and everyone has their preference I did a significant amount of research and believe I ended up with a great system.
• Rockslide Engineering steps with armor
• RockCrawler 2.5” 392 springs and isolators front and rear
• Currie anti-rocks front and rear - funny story under the Jeep removing the stock electronic stabilizer and hollered for my wife…hey, this thing is heavy and I don’t think I can hold it after I take out these last two bolts! Haha…
• King hydraulic bumps on the front - EVO kit
• Sumo springs + Teraflex bumps on the rear
• Bilstein 5160 w/ remote reservoirs
• RockJock control arms (8)
• RockJock track bar and rear re-locating bracket (axle mount)
• RockJock brake line extensions
• Synergy sector shaft brace
• Synergy parking brake drop bracket
• Synergy Yeti XD steering - RockJock stabilizer bracket and Synergy tie rod bracket to run Fox ATS stabilizer
• Fuel Covert beadlocks and Yokohama Geolander X-MT 37” tires w/ Apex valves and tape measure alignment
• Magnaflow Rock Crawler exhaust
• Adam’s front 1350 driveshaft
 

Attachments

  • IMG_4441.jpeg
    IMG_4441.jpeg
    248.4 KB · Views: 82
  • IMG_4440.jpeg
    IMG_4440.jpeg
    278.8 KB · Views: 86
  • IMG_4695.jpeg
    IMG_4695.jpeg
    258.4 KB · Views: 82
  • IMG_4677.jpeg
    IMG_4677.jpeg
    239.8 KB · Views: 79
  • IMG_4650.jpeg
    IMG_4650.jpeg
    255.7 KB · Views: 78
Last edited:
With the suspension done and chopping the frame to remove the drop downs for the sway bar I moved on. Tip on installing the synthetic winch line…I broke the pull wire Warn included and had to run out to the barn to get some bailing wire and during the walk back thought what can I use to lube this…DAWN dishwashing detergent to the rescue. Lubed up the end you insert through the drum and promptly fell on my butt when I pulled hard and the line shot right through! Do the Dawn to start with and pull gently!
• Teraflex Alpha HD spare tire carrier
• Next Venture Motorsport front and rear aluminum bumpers
• Warn Zeon 12-S with Warn solenoid (I have over-heated an XD9000 and had it blow out the control pack and not be able to stop it winching until it exploded out the side of an Optima battery. After that experience I put every winch on a solenoid and switch!)
• Diode Dynamics Stage Series 5” Pro and 3” Pro on front bumper (amber backlight)
• Diode Dynamics Stage Series 2” flood flush mount in rear bumper (red backlight) and HitchMount LED Pod
• SwichPros 9100 Panel mounted to driver A-Pillar
• Next Venture full skids with UHMW

Off-road Addiction in Oklahoma City installed
• 4.88 gears and RCV axles while they had it apart; unfortunately the rear axles were on back order for many months
• Apex steering boost and cooler
• Validated the suspension cycling
• Performed full alignment to include the 8 control arms

I wired the backlight function off the parking lights…whenever the parking lights are on the backlights are on. I wired the bumper reverse lights into the Switch Pros and also tied the Switch Pros trigger wire into the reverse circuit so they come on automatically in Reverse and you can hit a switch and have the rear lights on. I have done the backlights on a switch before and decided this time to have them on automatically anytime the parking lights are on and I like it better.

After hitting the gear break-in I changed gear oil and installed front and rear ARB diff covers in black.

My wife and I did the SMORR to MORE overland challenge and it was a blast…the MORE off-road Expo was a great time and the first off-road expo we have ever attended…also, picked up this little guy someone dumped 3 of them on the side of the road and we kept this guy, Yes, dog #4!
 

Attachments

  • IMG_4807.jpeg
    IMG_4807.jpeg
    256.7 KB · Views: 108
  • IMG_4809.jpeg
    IMG_4809.jpeg
    239 KB · Views: 123
  • IMG_4823.jpeg
    IMG_4823.jpeg
    270.9 KB · Views: 119
  • IMG_4821.jpeg
    IMG_4821.jpeg
    284.5 KB · Views: 121
  • IMG_4855.jpeg
    IMG_4855.jpeg
    256.4 KB · Views: 111
  • IMG_4856.jpeg
    IMG_4856.jpeg
    232.5 KB · Views: 109
  • IMG_5046.jpeg
    IMG_5046.jpeg
    156.9 KB · Views: 107
  • IMG_4464.jpeg
    IMG_4464.jpeg
    232.4 KB · Views: 104
  • IMG_4447.jpeg
    IMG_4447.jpeg
    253.8 KB · Views: 104
  • IMG_4901.jpeg
    IMG_4901.jpeg
    188.5 KB · Views: 110
Last edited:
OK, really looks great at this point and most malls should quake in fear…

I had started the build in February right after getting the Jeep but with a Senior in High School there is a lot of activities. She was also the POM team (dance) captain and they won Regionals, State and are National Champions! Any of you with kids in sports know parents have almost as much work to do as the kids and as fate would have it my Mom passed in April.

Time for first trip to SMORR to test it out in June…WOW traveling down the highway at 80 mph this thing is so LOUD…2.5 hours to SMORR. Worked incredible…considerably different than my old Bronco but one issue with the steering overheating, shutting off the pump and you have almost no steering. Hmm…that and the fear of body damage.

The Apex steering setup is a wonderful kit and I highly recommend to anyone NOT in a 392. Guys in the 4/6 cylinders are successfully running it with 40’s and no overheating.

Time to address the loudness:
Complete interior removal and installed Dynamat Ultimate followed by DynaPad 3/8” - these two were a ton of work. I would have completely blown the estimate on these as I told the wife weekend project and I spent 2 weeks on it! Dramatic difference…I would do it again and again…but did add weight to the Jeep probably in the 70 lb range.

I also installed the Desert Does It seat risers and front accessory rail…
 

Attachments

  • IMG_5153.jpeg
    IMG_5153.jpeg
    291.5 KB · Views: 105
  • IMG_5152.png
    IMG_5152.png
    1.5 MB · Views: 93
  • IMG_5032.jpeg
    IMG_5032.jpeg
    245.8 KB · Views: 98
  • IMG_5051.jpeg
    IMG_5051.jpeg
    297.9 KB · Views: 106
  • 123_1.jpeg
    123_1.jpeg
    223.5 KB · Views: 124
  • IMG_4275.jpeg
    IMG_4275.jpeg
    302 KB · Views: 121
  • IMG_5042.jpeg
    IMG_5042.jpeg
    387.3 KB · Views: 105
Last edited:
Next up was onboard air
• ARB twin mounted under the passenger seat
• GRIMM Off-Road mount with the connection mounted at the front bumper

Comms:
• Wouxon KG-1000+ under the passenger seat also with the head unit mounted on the dash accessory rail (67 Designs)
• Midland MXAT05VP Highland Antenna
• Icom speaker

Next test for the build was Jeep Jamboree Ozarks in Ozark, Arkansas September 2023. Check in on Thursday was glorious, sunny and 80*. It started raining about midnight and did not stop for the next 30 hours. I went into the Extreme group and wow, we had to hit stuff hard and fast…one of the climbs I had to do in 3rd about 60% throttle to make…basically became a rock bouncer getting all 4 tires about 3’ in the air. Not my style of driving…met some great folks and proved out the build but, once again, lost steering b/c of dreaded steering hot. Will work perfectly for 90% of the time off road but if you are in a spot and have to do lock to lock forward / back to get through a touch spot your steering will quit. Continually hung up in a creek bottom on the rear shock brackets. Next day was again sunny and 75* and dried up fairly quickly but stepped down from Orange / Red group to Yellow and was pretty much bored to death! Radio worked great and so did the on-board air. This was our first ever Jeep Jamboree and we loved it…

Ordered Next Venture Motorsport rear shock skids with UHMW.

In case I have not mentioned it I am terrible at taking pics…no kidding not a single pic of the compressor mounted! LOL. Man I have to get better at that…
 

Attachments

  • IMG_5068.jpeg
    IMG_5068.jpeg
    346.5 KB · Views: 70
  • IMG_5282.jpeg
    IMG_5282.jpeg
    245.6 KB · Views: 70
  • IMG_5070.jpeg
    IMG_5070.jpeg
    354.3 KB · Views: 81
  • IMG_5353.jpeg
    IMG_5353.jpeg
    137.7 KB · Views: 73
  • IMG_5409.jpeg
    IMG_5409.jpeg
    431 KB · Views: 78
  • IMG_5350.jpeg
    IMG_5350.jpeg
    273.7 KB · Views: 80
Last edited:
Now to prep for Moab Jeep Jamboree Expedition in October. I didn’t have much to do on the Jeep but my AAL tailgate came in so I got that mounted but the steering kept worrying me. I have never been to Moab and was worried about it overheating…note to self I would not have to worry but, the longer term build has PSC Big Bore / Hydro assist so I went ahead with it. I wanted to do the install myself but most of the shop vids I had seen said 12-16 hours but again, if you are on the trail and it breaks knowing how it went together goes a long way. 2 weeks until Moab and I stressed being able to take my time so opted to have Off-road Addiction do the install and on the 392 it is so much different then every other model it took them almost 16 hours and had to have the Jeep an extra day. In the true spirit of off road trips we picked it up on Saturday AM and left for Moab on Monday AM!

We had some issues with the steering in Moab…the tie rod clamp kept coming loose and we had to purchase a different bracket while in Moab and we developed a leak. I could not find Swepco, PSC’s preferred fluid, but we could find AC Delco which is a PSC approved alternative. Issues with the new clamp, I think we fixed it three times but finally held the last time and made the trip home without issue. The Jeep is currently back at the shop getting the leak addressed, flushing the system to get out the alternative fluid and changing up the clamp configuration.

Probably hard to believe but I actually don’t have a picture of the steering / Ram mounted! I know…crazy right…

I don’t know if you all do this but I encourage you to give it a try…buy some Paint Pens for metal from local hobby store, Amazon, whatever every single part I have removed and replaced / reinstalled I mark the bolt / nut and surrounding metal with just one line and you can tell at a glance if anything has came loose. It take me about 15 minutes on the creeper after a trip to check everything out. ALSO carry that stuff with you…I did not have it with me and made checking the steering a PITA but luckily another member had some and turned that into instead of getting a wrench out to check I could just look at the clamp bolts.


Also, I blue locktite everything and red certain things but I did not have any with me and messing with the clamp could have used it from the start…insert Good Samaritan above with the same paint pen and I think that is what made the last time finally hold. Add those two items to your trail kit…super small and light.
 

Attachments

  • IMG_5366.jpeg
    IMG_5366.jpeg
    216.1 KB · Views: 79
  • IMG_5430.jpeg
    IMG_5430.jpeg
    258.9 KB · Views: 76
  • IMG_5609.jpeg
    IMG_5609.jpeg
    347.3 KB · Views: 69
  • IMG_2384.jpeg
    IMG_2384.jpeg
    392.6 KB · Views: 70
  • IMG_2406.jpeg
    IMG_2406.jpeg
    375.4 KB · Views: 64
  • IMG_2340.jpeg
    IMG_2340.jpeg
    254.4 KB · Views: 72
  • IMG_9344.jpeg
    IMG_9344.jpeg
    257.6 KB · Views: 81
  • IMG_5367.jpeg
    IMG_5367.jpeg
    235.7 KB · Views: 77
  • IMG_4970.jpeg
    IMG_4970.jpeg
    230 KB · Views: 76
  • IMG_2316.jpeg
    IMG_2316.jpeg
    274.2 KB · Views: 80
The Moab trip got my wife to thinking about what if we really broke something and could not fix it easily so she gave the approval to add a new addition 23 RAM 2500 diesel and purchased a new 2023 model Aluma trailer that is full 102” wide with drive on fenders but is NOT a deck over (too tall IMO). We pick it up on Friday…

Next up for the Jeep I have
• Motobilt washer tank
• AAL inner fenders and high line / split fender lights (I have had them for the last 6-7 weeks but have not gotten around to them and also worried the 14 hour drive to Moab may have fender flopping
• Diode Dynamics rock lights (pending inner fenders)
• Next Venture rear shock skids received and I have them painted ready to install
• Mac’s axle tie down tabs to weld on

Also started getting a shake (baby death wobble) on the way home and while at the shop I was informed the track-bar bushings are toast…called RockJock and they said to send them a video and they would take care of it. Will do that after I pick up the Jeep.


Next trip is Hot Springs at the end of November if anyone is interested…meeting two guys from the Ozarks Jamboree. The more the merrier…

I will keep you all posted and try to take more pics! Hope you enjoyed the journey so far…

And in the middle of this my wife and I become Grand Parents on August 3 thank the heavens my daughter is GREAT at taking pictures!
 

Attachments

  • IMG_0033.jpeg
    IMG_0033.jpeg
    222.8 KB · Views: 101
  • IMG_0034.jpeg
    IMG_0034.jpeg
    280.4 KB · Views: 75
  • IMG_7362.jpeg
    IMG_7362.jpeg
    182.6 KB · Views: 74
  • IMG_5606.jpeg
    IMG_5606.jpeg
    289.4 KB · Views: 81
  • IMG_5607.jpeg
    IMG_5607.jpeg
    277.5 KB · Views: 66
  • IMG_5615.jpeg
    IMG_5615.jpeg
    285.6 KB · Views: 69
  • IMG_5616.jpeg
    IMG_5616.jpeg
    315 KB · Views: 94
  • IMG_5185.jpeg
    IMG_5185.jpeg
    78.3 KB · Views: 104
Last edited:
Drove the rig home from OKC with the new setup. Wow! Drives amazing. I picked up one of the weigh safe hitches and loaded to 700 lbs tongue weight.

Edit: here are some pics of the ram setup now. Rock jock axle bracket and 4X4 Garage tie rod bracket.

If you have not heard of 4X4 garage check them out. I think their bracket is the best you can get and they are fantastic to work with.
 

Attachments

  • IMG_5645.jpeg
    IMG_5645.jpeg
    222.1 KB · Views: 84
  • IMG_5648.jpeg
    IMG_5648.jpeg
    196.9 KB · Views: 84
  • IMG_5650.jpeg
    IMG_5650.jpeg
    177.5 KB · Views: 65
  • IMG_5651.jpeg
    IMG_5651.jpeg
    198.2 KB · Views: 80
Last edited:
Looks good!

Question for you about the trailer - what length did you go with for it? Looks like 20’?
I went with a 22’ and probably spent too much time thinking about it!

I have a friend that built an aluminum box for the front of his about 5’ tall and 2.5’ deep and he keeps his Jeep spare, parts and a toolbox on a slide and it also acts as an air dam. I will probably end up with something similar.
 
Installed 1” taller rear springs…I previously sit .2 degrees higher in the rear but once loading ARB fridge, recovery gear and tools I would sit much lower and while on the last trip I was getting into the inner fender liners so decided to increase the rear height by 1. It now sits .6 degrees higher or .4 change.

I also installed the Next Venture rear shock skids…I had to use a torch and heat up the drivers side rear shock bracket because it was so bent out of shape…take a look at the skids and consider putting them on early in your build!
 

Attachments

  • IMG_5697.jpeg
    IMG_5697.jpeg
    329.3 KB · Views: 51
  • IMG_5696.jpeg
    IMG_5696.jpeg
    284.3 KB · Views: 50
  • IMG_5695.jpeg
    IMG_5695.jpeg
    263.2 KB · Views: 51
  • IMG_5699.jpeg
    IMG_5699.jpeg
    280.4 KB · Views: 51
Last edited:
Great write up , very informative.
How do you like the Yokohama's and are you happy with the anti-rock setup?
 
I installed the lift, anti-rocks, wheels and tires all at the same time. Drove out and hit the road and thought oh my what have I done! It drives so different from stock. So much looser? Or leans more. But after a week I came to enjoy it as much as the firm / tight stock feeling. So I guess I would say it is really different feeling.

Every off-road trip I see guys with sway bars connected and they say pita to mess with so they don’t. The anti-rocks eliminate that issue and even us with the electric front the rear stays connected. I would say up to you, if, you are going to wheel it definitely worth a look.

I really like the Yokohamas when I bought I knew I would be on 40’s before the tires needed replaced and these were the second least expensive 37” at the time. Milestars were the least expensive but I do not like the looks of them. The yoks are amazingly quiet. Everyone that gets in comments in that. Price right, look great, quieter than other mud tires made my decision.
 
Last edited:
Added the Motobilt windshield washer tank and installed the non-392 AAL inner fenders powder-coated grey to match. I have not installed the rears yet nor split the fenders. Leaning toward NVM fenders instead.

Of course I did not take a picture post washer tank before installing inner fenders.l but it was pretty straightforward install without issue.
 

Attachments

  • IMG_5741.jpeg
    IMG_5741.jpeg
    200.2 KB · Views: 56
  • IMG_5731.jpeg
    IMG_5731.jpeg
    217.1 KB · Views: 56
Last edited:
Added the Motobilt windshield washer tank and installed the non-392 AAL inner fenders powder-coated grey to match. I have not installed the rears yet nor split the fenders. Leaning toward NVM fenders instead.

Of course I did not take a picture post washer tank before installing inner fenders.l but it was pretty straightforward install without issue.
I sure wish warn would have instructed us to use soap on winch line install. Great idea. It was a pita to do it dry.
 
Can you elaborate on your thoughts about the Apex power steering and why it would work on some vehicles but not the 392. I thought the power steering pumps were identical, but perhaps I'm wrong. I definitely experience all kinds of binding with 37 inch Nitto's when rock crawling, and would like to try to improve that situation and was leaning towards Apex, but don't want to do it if I'm not gonna be happy with the results.
 
My thought from reading and chatting with JL forum members the Apex kit works great on the 2.0 and 3.6 motors because of lower under hood temperatures. Across the platforms the 392 is in and two off road shops all talk about how hot the 392 is. Pure data point compilation on my part with zero actual tests to prove that is the issue. I have not found anyone with the Apex kit and 37-40” tires get the pump overheat warning unless they have a 392 and I have found 3 of us with the issue.

One user in here installed a fan blowing on the pump and cut out inner fender and last report was working. I wish I would have tried the Apex plus the spal fan mod.

I noticed in the diesel PSC reuses the factory pump with increased pressure and add their gearbox and ram. But on the 392 they are still replacing the pump.
 
Your hypothesis seems to make sense to me as well. The fan is a good idea. Im not ready to go thee PSC route, I drive it on the street too much. Thanks for the response.

Great work on your 392! I like everything you have done.
 

7% off 2024 Jeep Wrangler 392 Granger Motors Just Bolt Ons.com MARK CDJR in Lake Charles Louisiana Underground Graphics

Latest Discussions

Back
Top