What did you do to your Jeep 392 today? 🛠️

Fully understand. I'm not ready yet, nor do I have the knowledge to start drilling holes in an an almost $100K vehicle. I think this option works best for me. Knowing me, I'd screw the whole thing up and end up ordering all new roof because I didn't measure everything just right. Just can't pull that trigger. This is a whole new thing for me.
It is a lot easier than it seems, but I agree that drilling into a new vehicle is not something preferred. I was mentioning it more as a side note, Frontrunner provides a kit to patch the holes back in case one changes their mind. Due to where the holes are drilled, they're quite hidden from the inside.

Anyway, enjoy your 392. Looks really nice!
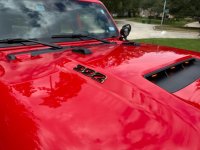
 
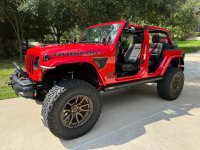
I officially finished getting rid of all the grey trim on the 392. Grill trim, headlight surrounds and JEEP side emblems were replaced last year. Today I replaced the 392 badges with matte black and gold from Distinction Applied. Paint match is perfect. I have several products from them, great customer service, great products. I have a few more cosmetic changes coming soon, for better or worse…
 

Attachments

  • ad1ce9ac-f41e-445e-a1cb-d56ebc2914c9.jpeg
    ad1ce9ac-f41e-445e-a1cb-d56ebc2914c9.jpeg
    78 KB · Views: 130
  • 91171255-3923-4527-a172-3a55b3dc8379.jpeg
    91171255-3923-4527-a172-3a55b3dc8379.jpeg
    85.7 KB · Views: 131
  • aafbdc63-1836-48e0-a745-b61a5dc4d482.jpeg
    aafbdc63-1836-48e0-a745-b61a5dc4d482.jpeg
    81.3 KB · Views: 131
Fully understand. I'm not ready yet, nor do I have the knowledge to start drilling holes in an an almost $100K vehicle. I think this option works best for me. Knowing me, I'd screw the whole thing up and end up ordering all new roof because I didn't measure everything just right. Just can't pull that trigger. This is a whole new thing for me.
There actually isnt anything to measure. All the holes are drilled using a hard rail template and an offset part. Watch the install video for later.
 
Thanks!

The RSE steps were pretty easy to install. 95% is doable by one person, but mounting the steps to the body it's helpful to have a second set of hands. My wife was able to help me without any problem at all. I didn't run into any problems at all during the install - for the body bolts, I used a 1/2" 24" breaker bar and loosened each bolt with the back and forth method. I would loosen about 3/4-1 full turn, then tighten 1/4-1/2 turn. Keep going back and forth like that, and it'll keep things from gumming up and causing headaches. Eventually you'll get the bolts to a point where you don't need to go back and forth anymore, and they'll loosen quite easily. Whatever you do, DO NOT use an impact. I think the TQ value was 80 ft/lbs, so it's not like they're very tight anyway. Hand tools only!

There were one or two body bolts that I had to file the threads at the washer just a little bit to get the necessary room between the washer and bolt head to install the brackets - but I didn't remove the bolts all the way for any of them. I was super nervous, but proper planning and patience really paid off. I love having the steps and so does my 5'2" wife! They've been trouble-free too.

I did go all in adding the armor, lights (well worth it) and the doors off kit - but each of those can be added later too to help spread out the cost if that's a concern. I've sine gone back in and removed the switches for the rear doors. I never have rear passengers (and actually have the Goose Gear rear seat delete waiting for me to install). Not having the steps drop down when I open a rear door is really convenient for my use case - I don't ever have to worry about the step being in my way when trying to load stuff in through the rear doors. Besides, if I were to need the steps down for the rear doors, odds are very likely that someone will have also opened a front door anyway, triggering the step.

Good luck! I definitely don't regret the RSE steps.

Oh - and don't let the electrical part of the install scare you off. RSE puts together a really nice harness and it's completely standalone. No tying into the Jeep electrical at all.
Thx Redbeard, I am going to go for it. Reall appreciate the information. Those little tips can make a huge difference. Many thx!
 
Thx Redbeard, I am going to go for it. Reall appreciate the information. Those little tips can make a huge difference. Many thx!
Couple things to check before you lift the 64lb slider up. Check the pinch weld holes and make sure they are open totally. A few of mine were 1/2 closed and I had to ream them to get the slider studs to go through. Plus , lay out your wiring harness under the Jeep to get a feel for the routing. I started at the passenger rear door and routed the connection on top of the frame rail and then up to the battery.
Plus, some of the door pictures are mislabeled in the instructions. The front door sensor pics are fine. The rear door pics show 2 ways. The easiest for me was to install the rear door sensors at the hinges instead of at the latches, but it works either way.
 
IMG_7410.jpeg
IMG_7411.jpeg

Got the bumpers removed, cleaned up a spot inside the garage to park finally and installed a billet radio antenna.
 
Couple things to check before you lift the 64lb slider up. Check the pinch weld holes and make sure they are open totally. A few of mine were 1/2 closed and I had to ream them to get the slider studs to go through. Plus , lay out your wiring harness under the Jeep to get a feel for the routing. I started at the passenger rear door and routed the connection on top of the frame rail and then up to the battery.
Plus, some of the door pictures are mislabeled in the instructions. The front door sensor pics are fine. The rear door pics show 2 ways. The easiest for me was to install the rear door sensors at the hinges instead of at the latches, but it works either way.
FYI, one of those little hydraulic lift carts works wonders for mounting these.
 
Took the short 1 hour trip to Underground Graphics in Houston to get some 392 decals installed. Great experience, fantastic customer service, professional installation. By the way, Jeep and Bronco decals are only a sliver of what they bring to market. All you Houston area boys need to check them out for all of your toys, not just your Jeep. They are fully custom, if you can dream it they can make it.
 

Attachments

  • IMG_3205.jpeg
    IMG_3205.jpeg
    301 KB · Views: 85
  • IMG_3206.jpeg
    IMG_3206.jpeg
    323.4 KB · Views: 85
  • IMG_3207.jpeg
    IMG_3207.jpeg
    359 KB · Views: 80
  • IMG_3208.jpeg
    IMG_3208.jpeg
    357.5 KB · Views: 87
Installed front/rear ARB diff breather relocation. Not plug and play out of box if you do it but I wasn’t gonna use some of the supplied stuff anyway. You do have to add threads to the front differential housing if you want to get rid of the press fitting.
Rear:
IMG_5601.jpeg

IMG_5598.jpeg

Front:
IMG_5614.jpeg

IMG_5617.jpeg
 
Installed an AAL platform and mounted a Badlands jack. Starage box will be installed on other side soonish.
View attachment 26244
View attachment 26245
Not trying to crap on your setup but I'm extremely curious to know... why a floor jack over a bottle jack? I've been offroading for 20+ years and have never had a situation, and there's been plenty in the desert, rocks, and dunes, in which I needed/wished Id brought along anything more than a bottle jack, a couple hopups (i.e. base plate and saddle) and a little ingenuity.
 
Not trying to crap on your setup but I'm extremely curious to know... why a floor jack over a bottle jack? I've been offroading for 20+ years and have never had a situation, and there's been plenty in the desert, rocks, and dunes, in which I needed/wished Id brought along anything more than a bottle jack, a couple hopups (i.e. base plate and saddle) and a little ingenuity.
IMG_5618.jpeg
 
Fully understand. I'm not ready yet, nor do I have the knowledge to start drilling holes in an an almost $100K vehicle. I think this option works best for me. Knowing me, I'd screw the whole thing up and end up ordering all new roof because I didn't measure everything just right. Just can't pull that trigger. This is a whole new thing for me.
Smart man who knows his limitiations. Looks like a great option for additional low weight storage.
 
Got my Terra Acoustics today, we shall see if this helps……
Finally got around to installing the TA speakers. At first blush I don't notice any appreciable difference. I'll give it the 5 hour recommended break in and see what it sounds like then.....
 
Took the short 1 hour trip to Underground Graphics in Houston to get some 392 decals installed. Great experience, fantastic customer service, professional installation. By the way, Jeep and Bronco decals are only a sliver of what they bring to market. All you Houston area boys need to check them out for all of your toys, not just your Jeep. They are fully custom, if you can dream it they can make it.
Looks GREAT! I got my hood done with some @Underground Graphics today too. *I posted these in some other threads, but you might not see those, so hear they are again.
Wrangler 3.jpg
Wrangler 2.jpg
 
Finally got around to installing the TA speakers. At first blush I don't notice any appreciable difference. I'll give it the 5 hour recommended break in and see what it sounds like then.....
Took mine quite a bit longer than 5 hours to settle in. Give them some time…I pulled mine out after a week and put the stock back in and quickly realized my mistake. So I put the TA back in and they eventually broke in and now I’m happy with them.
 
Back
Top